Adjustable Dripper With Stake: Are There Installation Tips? How to Set Flow for Water Saving?
Content
- 1 Why Is Correct Installation of Adjustable Dripper With Stake Important?
- 2 What Are the Key Installation Tips for Adjustable Dripper With Stake?
- 2.1 1. Prepare the Installation Tools and Check the Dripper First
- 2.2 2. Determine the Installation Position According to the Plant Root Distribution
- 2.3 3. Insert the Stake at the Right Depth to Ensure Stability
- 2.4 4. Connect the Dripper to the Water Pipe Tightly to Prevent Leakage
- 2.5 5. Adjust the Water Outlet Direction to Avoid Waste
- 3 How to Set the Flow Rate of Adjustable Dripper With Stake to Save Water?
- 3.1 1. Understand the Flow Rate Range of the Dripper and the Water Demand of Plants
- 3.2 2. Set the Flow Rate by Rotating the Adjustable Knob—Master the "Gradual Adjustment" Method
- 3.3 3. Combine the Plant Growth Stage to Adjust the Flow Rate Dynamically
- 3.4 4. Match the Flow Rate with the Soil Type to Reduce Water Loss
- 4 What Other Precautions Are There for Using Adjustable Dripper With Stake?
In home gardening, potted plants, and small-scale outdoor green spaces, the Adjustable Dripper With Stake has become a popular irrigation tool. It delivers water directly to the root zone of plants, avoiding water waste caused by traditional sprinkler irrigation (such as water evaporation and runoff). However, many users find that the irrigation effect is not ideal after purchase—either the plants are short of water due to improper installation, or water is wasted because the flow rate is not set properly. This article will detail the installation skills of the Adjustable Dripper With Stake and the methods to set the flow rate for water saving, helping you maximize its performance.
Why Is Correct Installation of Adjustable Dripper With Stake Important?
Before mastering the specific installation skills, it is necessary to understand why correct installation matters. The core function of the Adjustable Dripper With Stake is to "accurately deliver water to the plant roots". If installed incorrectly, this function will be greatly reduced: for example, if the dripper is too far from the root system, most of the water will seep into the soil outside the root zone, resulting in water waste and insufficient water for plants; if the stake is inserted too shallowly, the dripper will tilt or fall due to wind or soil loosening, and the water outlet direction will deviate.
In addition, incorrect installation may also damage the dripper or the water pipe connected to it. For example, if the connection between the dripper and the water pipe is not tight, water will leak at the joint, which not only wastes water but also may cause the soil around the pipe to be too wet and breed mold. Therefore, correct installation is the prerequisite for ensuring the normal operation of the Adjustable Dripper With Stake and achieving water-saving irrigation.
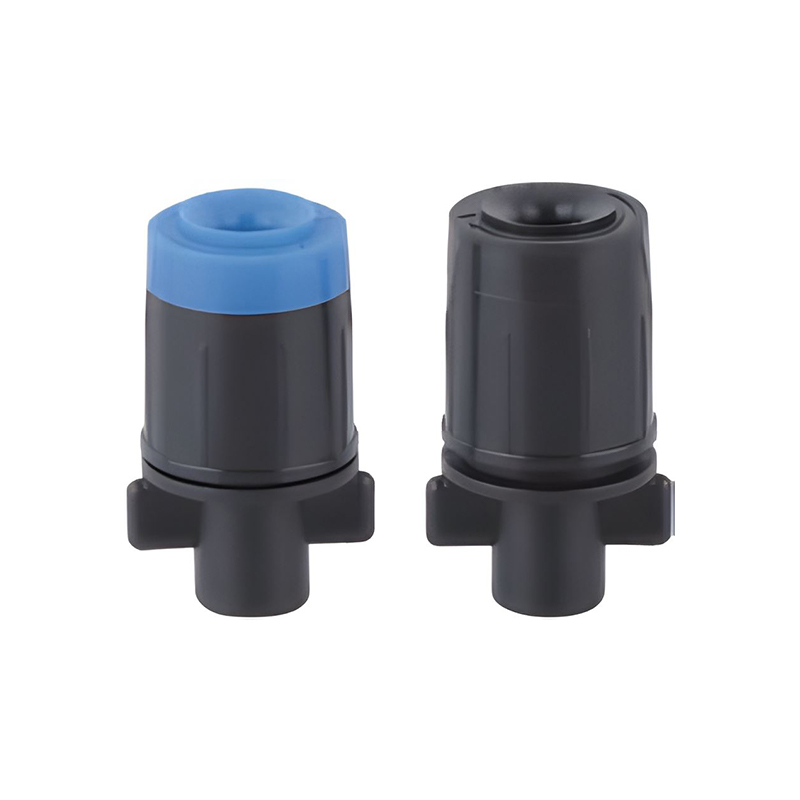
What Are the Key Installation Tips for Adjustable Dripper With Stake?
The installation of the Adjustable Dripper With Stake seems simple, but there are many details that need attention. The following are the key steps and skills to ensure stable installation and efficient water delivery:
1. Prepare the Installation Tools and Check the Dripper First
Before installation, prepare the necessary tools: a pair of scissors (for cutting the water pipe), a small shovel (for loosening the soil around the plant roots), and a rag (for wiping the water pipe interface). At the same time, check the dripper itself: confirm that the adjustable knob can rotate smoothly (without jamming), the water outlet is unobstructed (no debris blockage), and the stake is firm (no cracks or bending). If the dripper has been stored for a long time, it is recommended to connect it to a water source temporarily to test whether the water flow is normal—this can avoid installing a defective dripper and reworking later.
2. Determine the Installation Position According to the Plant Root Distribution
The most critical step in installation is to find the "root water absorption zone" of the plant. For most potted plants or small shrubs, the root system is usually distributed within 5-15 cm around the plant stem (the range varies according to the plant size: small herbs such as mint have a shallower and narrower root range, while small fruit trees such as strawberries have a wider root range). The dripper should be installed in this area—specifically, insert the stake 3-5 cm away from the plant stem. If the dripper is too close to the stem, it may cause the stem base to be too wet and rot; if it is too far, the roots cannot absorb water in time.
For plants with taproots (such as carrots, radishes), the dripper should be installed slightly closer to the stem (about 3 cm), because the taproot extends downward, and the lateral roots that absorb water are concentrated near the stem. For plants with fibrous roots (such as spinach, celery), the dripper can be installed a little farther (about 5-8 cm) to cover more lateral roots.
3. Insert the Stake at the Right Depth to Ensure Stability
The length of the stake of the Adjustable Dripper With Stake is usually 10-15 cm. When inserting, the depth should be 2/3 of the stake length (that is, 6-10 cm inserted into the soil). This depth can ensure that the stake does not tilt or fall, and the water outlet of the dripper is just above the root zone (not buried in the soil, which will block the water outlet; nor too high, which will cause water to splash outside).
When inserting the stake, do not use brute force—first use a small shovel to loosen the soil around the installation position (avoid damaging the plant roots), then hold the top of the dripper and insert the stake vertically into the soil. If the soil is hard (such as dry clay soil), you can water the soil slightly first to soften it, and then insert the stake—this can prevent the stake from breaking.
4. Connect the Dripper to the Water Pipe Tightly to Prevent Leakage
After fixing the stake, connect the dripper to the main water pipe (usually a 4/7 mm or 1/2 inch drip irrigation pipe). Before connection, wipe the end of the water pipe with a rag (to remove dust or soil on the surface), then insert the pipe into the dripper interface with moderate force—usually, the pipe needs to be inserted 1-2 cm into the interface to ensure tightness. If the interface is loose (you can pull the pipe gently to test), you can wrap a layer of waterproof tape around the pipe end (do not wrap too thick, so as not to affect insertion) to enhance the sealing.
Note: Do not cut the water pipe too short or too long. The pipe between the dripper and the main pipe should be kept straight (without excessive bending), because bending will reduce the water pressure and affect the water flow of the dripper.
5. Adjust the Water Outlet Direction to Avoid Waste
After connecting the water pipe, open the main water valve slightly (to let the water flow into the dripper slowly), and then adjust the direction of the dripper's water outlet: the water outlet should face the soil (not the plant leaves or the air). If the water outlet faces the leaves, the water will stay on the leaves, which may cause leaf rot (especially in humid environments) and reduce the amount of water reaching the roots; if it faces the air, water will splash outside the root zone. The ideal state is that the water flows out of the dripper and directly soaks the soil in the root zone, forming a "wet circle" with a diameter of 5-10 cm (depending on the plant size).
How to Set the Flow Rate of Adjustable Dripper With Stake to Save Water?
The "adjustable" feature of the Adjustable Dripper With Stake is the key to water saving. Different plants, growth stages, and soil types require different flow rates. Setting the appropriate flow rate can ensure that plants get enough water without wasting a drop. Here are the specific setting methods and principles:
1. Understand the Flow Rate Range of the Dripper and the Water Demand of Plants
First, check the product manual of the dripper to confirm its flow rate range (most household Adjustable Dripper With Stake have a flow rate range of 0-20 L/h, and the specific value is marked on the dripper body). Then, understand the "daily water demand" of the plant:
- Low water demand plants: Such as succulents, cacti, and lavender. Their water demand is small, and the daily water demand per plant is usually 50-100 mL. The dripper flow rate should be set to 2-5 L/h, and the irrigation time is 10-15 minutes (calculation: 2 L/h = 33 mL/min, 10 minutes = 330 mL—you can adjust the time according to the soil moisture, and avoid overwatering).
- Medium water demand plants: Such as tomatoes, peppers, and roses. Their daily water demand is moderate, usually 150-300 mL per plant. The dripper flow rate can be set to 5-10 L/h, and the irrigation time is 15-20 minutes.
- High water demand plants: Such as lettuce, celery, and hydrangeas. They need more water, and the daily water demand per plant is 300-500 mL. The dripper flow rate can be set to 10-15 L/h, and the irrigation time is 20-25 minutes.
Note: The above data are for reference only. The actual water demand will increase in hot and dry weather (such as summer noon) and decrease in cold and humid weather (such as winter or rainy days).
2. Set the Flow Rate by Rotating the Adjustable Knob—Master the "Gradual Adjustment" Method
The adjustable knob of the dripper is usually located at the top of the dripper (or near the water outlet). Rotating the knob can change the size of the internal water channel, thereby adjusting the flow rate. The specific operation method is:
- Step 1: Close the flow first: Rotate the knob clockwise to the end until no water flows out—this is the "closed state", which can prevent water from splashing when adjusting.
- Step 2: Gradually increase the flow: Rotate the knob counterclockwise slowly, while observing the water flow state. When the water flow just forms a "slow and uniform drip" (not a spray or a fast stream), stop rotating. At this time, the flow rate is usually in the low to medium range (suitable for low or medium water demand plants).
- Step 3: Adjust according to soil moisture: After setting the initial flow rate, observe the soil moisture after irrigation. For potted plants, you can insert your finger 2-3 cm into the soil—if the soil is slightly wet (not sticky to the hand), the flow rate is appropriate; if the soil is dry (no moisture on the finger), you need to rotate the knob counterclockwise a little to increase the flow rate; if the soil is too wet (sticky to the hand and has water seepage), rotate the knob clockwise to reduce the flow rate.
Avoid rotating the knob too hard—excessive force may damage the internal seal of the dripper, leading to irreversible water leakage.
3. Combine the Plant Growth Stage to Adjust the Flow Rate Dynamically
The water demand of plants changes with the growth stage, so the flow rate of the dripper should also be adjusted dynamically:
- Seedling stage: The root system of seedlings is weak and has low water demand. The flow rate should be set to the lowest level (2-3 L/h), and the irrigation time should be short (5-10 minutes) to avoid washing away the seedlings or causing root rot.
- Growth stage (vegetative growth): The plant grows rapidly, and the root system expands. The flow rate can be increased to the medium level (5-10 L/h), and the irrigation frequency can be appropriately increased (e.g., from once every 2 days to once a day) to meet the water demand for leaf and stem growth.
- Flowering and fruiting stage: The plant needs more water to support flower and fruit development. The flow rate can be increased to the medium-high level (10-15 L/h), but attention should be paid to "not overwatering"—for example, tomato plants in the fruiting stage are prone to cracking if the soil is too wet, so the flow rate should be controlled to keep the soil slightly moist.
- Dormant stage: For deciduous plants (such as roses, chrysanthemums), the water demand decreases significantly in the dormant stage (winter). The flow rate should be reduced to the lowest level (even only 1-2 L/h), and the irrigation interval should be extended (e.g., once every 5-7 days).
4. Match the Flow Rate with the Soil Type to Reduce Water Loss
Different soil types have different water retention capacities, which also affect the setting of the dripper flow rate:
- Sandy soil: Sandy soil has large gaps and poor water retention—water seeps quickly. If the flow rate is too high, the water will seep into the deep soil (beyond the root zone) before the roots absorb it. Therefore, the flow rate should be set to a lower level (2-5 L/h), and the irrigation time should be prolonged (e.g., 20-25 minutes) to let the water slowly soak the soil and be absorbed by the roots.
- Clay soil: Clay soil has small gaps and strong water retention—water seeps slowly. If the flow rate is too high, the water will accumulate on the soil surface (causing runoff) and the roots will be anoxic. Therefore, the flow rate should be set to a medium level (5-8 L/h), and the irrigation time should be shortened (e.g., 10-15 minutes). It is also possible to divide the irrigation into two times (e.g., irrigate for 10 minutes, wait for 30 minutes, and then irrigate for 10 minutes) to let the water seep fully.
- Loam soil: Loam soil has moderate water retention and seepage performance, which is the most ideal soil type. The flow rate can be set to a medium level (5-10 L/h), and the irrigation time can be adjusted according to the plant's water demand—usually 15-20 minutes is appropriate.
What Other Precautions Are There for Using Adjustable Dripper With Stake?
In addition to correct installation and reasonable flow rate setting, the following precautions can further improve the water-saving effect of the Adjustable Dripper With Stake and extend its service life:
1. Clean the Dripper Regularly to Prevent Blockage
The water outlet of the dripper is small (usually 0.5-1 mm in diameter), so it is easy to be blocked by impurities in the water (such as sediment, algae) or soil particles. Once blocked, the water flow will decrease or stop, resulting in insufficient water for plants. It is recommended to clean the dripper once every 2-3 weeks:
- Simple cleaning: Rotate the adjustable knob to the maximum flow rate, and use a small brush (such as a toothbrush) to gently brush the water outlet to remove surface debris.
- Deep cleaning: If the blockage is serious, remove the dripper from the water pipe, soak it in a basin of clean water for 10 minutes, then use a thin needle (or the cleaning needle attached to the dripper) to poke the water outlet gently (do not use too much force to avoid expanding the water outlet). After cleaning, reconnect it to the water pipe and test the water flow.
2. Avoid Exposing the Dripper and Water Pipe to Direct Sunlight
Long-term direct sunlight will accelerate the aging of the dripper and water pipe (especially plastic materials), leading to brittle cracking and water leakage. For outdoor use, it is recommended to cover the water pipe with a layer of soil (about 2 cm thick) or use a sun-shading cloth to block the sun. The dripper itself can be covered with a small amount of mulch (such as straw, bark)—this not only avoids sun exposure but also reduces water evaporation from the soil.
3. Use a Filter to Improve Water Quality
If the water source used (such as tap water with more sediment, well water) has more impurities, it is recommended to install a small filter at the water inlet of the drip irrigation system (before the main pipe). The filter can intercept sediment, algae, and other impurities, preventing them from entering the dripper and causing blockage. The filter should be cleaned once a month—take out the filter screen, rinse it with clean water, and then install it back.
4. Turn Off the Water Source in Time When Not in Use
If you do not need to irrigate for a long time (such as going out for travel), you must turn off the main water valve connected to the dripper. This can avoid water waste caused by unexpected water pressure changes (such as sudden increase in water pressure leading to dripper damage and leakage) and prevent the soil from being overwatered. Before going out, it is also recommended to check all drippers once to confirm that there is no leakage.
The Adjustable Dripper With Stake is a "water-saving expert" in home gardening, but its effect depends entirely on correct installation and scientific flow rate setting. By mastering the installation skills—such as determining the correct position according to the root distribution, inserting the stake at the right depth, and ensuring tight connection of the water pipe—you can ensure that water is delivered to the plant roots accurately. By setting the flow rate according to the plant's water demand, growth stage, and soil type, you can achieve "on-demand irrigation" and maximize water saving.
In addition, regular cleaning of the dripper, avoiding sun exposure, and using a filter can further extend the service life of the dripper and maintain its stable performance. As long as you pay attention to these details, the Adjustable Dripper With Stake will become a powerful assistant for your green space, helping you cultivate healthy plants while contributing to water conservation.


 Search for...
 English
 Español
 中文简体
中文简体


 No.518, Ruihao Road, Lizhou Street, Yuyao City, Zhejiang Province, China
 +86-13105554615 / +86-18005843886
 decheng@dcssq.com fredzhu@dcssq.com

